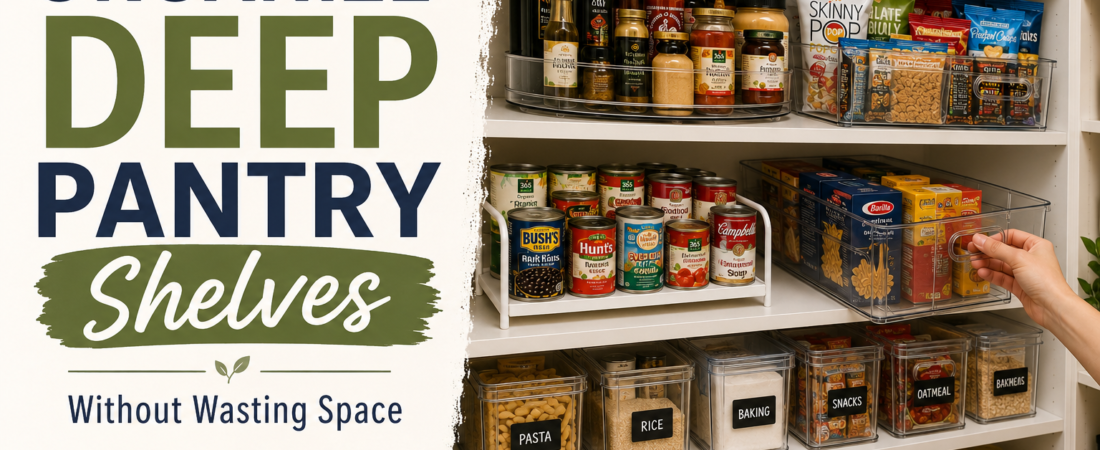
Deep pantry shelves sound like a good thing—until you realize half your groceries have disappeared somewhere behind the cereal boxes.
The problem with deep shelves isn’t necessarily a lack of storage space. It’s that much of the space is difficult to see, reach, and use efficiently.
Food gets pushed toward the back. Smaller packages disappear behind larger ones. You buy another jar of pasta sauce because you couldn’t see the three you already had. Eventually, the front half of the shelf becomes crowded while the back half turns into forgotten storage.
Fortunately, you don’t need to remodel your pantry to fix it.
The key is organizing deep pantry shelves based on how far you can comfortably reach, what you’re storing, and how each organizer uses the depth of the shelf.
Here’s how to organize deep pantry shelves without wasting all that space behind your groceries.
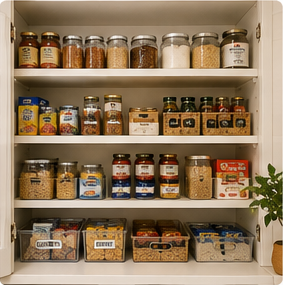
Start by Measuring Your Pantry Shelves
Before buying organizers, measure the actual space you’re working with.
For each shelf, measure:
- Width from side to side
- Depth from the front edge to the back wall
- Height between shelves
- Usable opening if a door frame, trim or hinges restrict access
Don’t assume every shelf is identical. Pantry shelving can vary slightly, especially if shelves are adjustable.
The most important measurement for a deep pantry is usually usable depth.
An organizer that is significantly shallower than your shelf may leave valuable space unused behind it. But buying the deepest organizer you can find isn’t automatically better either.
A 20-inch-deep bin isn’t particularly useful if you have to remove everything in front of it just to reach what’s stored at the back.
The goal isn’t simply to fill every cubic inch.
The goal is to make as much of the pantry as possible usable without constantly moving things around.
Write your measurements down before shopping. This one step can prevent a pantry full of organizers that look great online but don’t actually work in your space.
Why Deep Pantry Shelves Are So Hard to Organize
Deep shelves create what is essentially a visibility problem.
Imagine placing three cans in a row from the front of a shelf to the back.
The front can is easy to see.
The second is partially hidden.
The third might as well not exist.
The same thing happens with boxes, jars, bags and bottles. The deeper the shelf becomes, the easier it is to create several layers of food where only the first layer remains visible.
That’s why simply lining everything up neatly rarely fixes a deep pantry.
Instead, you need storage methods that do at least one of three things:
bring items forward, raise items into view, or let you access the back without unloading the front.
Once you start thinking about the pantry that way, choosing organizers becomes much easier.
1. Use Turntables for Bottles, Jars and Condiments
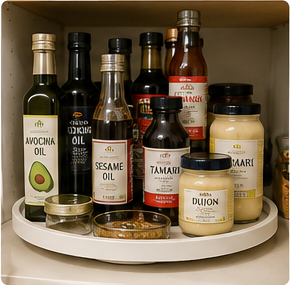
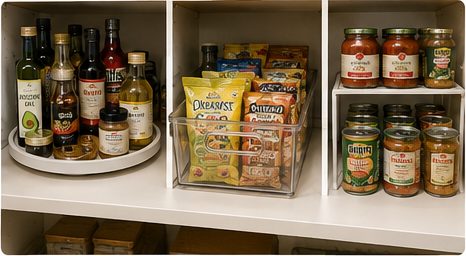
A turntable is one of the simplest ways to make a deep shelf more accessible.
Instead of reaching behind several bottles to find the one you need, rotate the turntable until it comes to you.
Pantry turntable for bottles and jars → View on Amazon
They’re especially useful for:
- Oils and vinegars
- Sauces
- Condiments
- Nut butters
- Spreads
- Small jars
- Baking ingredients
- Frequently used bottles
Turntables work best when the items stored on them are relatively similar in height and aren’t packed so tightly that they fall over when rotated.
Before buying one, measure both the shelf depth and the diameter of the turntable.
A large turntable can make excellent use of a deep shelf, but only if you still have enough clearance to rotate it comfortably.
Also remember that a round organizer inside a rectangular pantry naturally leaves some unused space around the corners.
That’s perfectly fine if the tradeoff is dramatically better access.
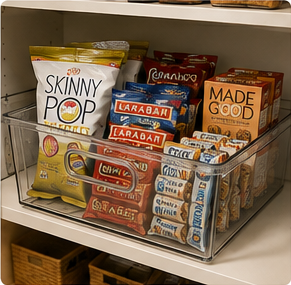
2. Use Long Pull-Out Bins to Bring the Back of the Shelf Forward
For certain foods, a long bin can turn an awkward deep shelf into something closer to a drawer.
Instead of reaching past everything in front, you pull the entire bin toward you.
This works particularly well for:
- Snack bags
- Granola bars
- Baking supplies
- Pasta
- Rice and grains
- Small boxed foods
- Packets and pouches
The important word here is pull-out.
A deep bin that cannot be pulled out easily can actually make the problem worse. You end up with the same inaccessible back area, except now it’s inside a plastic container.
Look for bins with a shape or handle that allows you to comfortably slide them forward.
And don’t automatically buy the longest bin that fits your shelf.
If the pantry opening is narrower than the interior shelf, for example, a wide bin may technically fit inside the pantry but be difficult to remove through the opening.
Clear pull-out pantry bins → View on Amazon
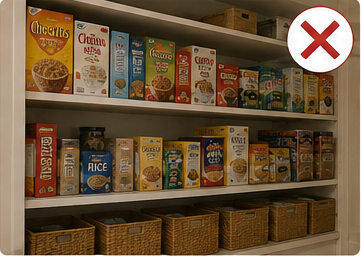
3. Don’t Put Small Items Behind Large Items
This is one of the easiest deep-pantry mistakes to make.
You put large cereal boxes or containers toward the front and smaller packages behind them.
Instantly, the smaller food becomes invisible.
If you’re going to use the full depth of a shelf without bins or pull-outs, reverse the logic.
Keep shorter items toward the front and taller items toward the back whenever practical.
That creates a natural sightline into the shelf.
It won’t solve every deep-shelf problem, but it’s considerably better than building a wall of cereal boxes in front of everything else.
4. Use Shelf Risers to Create Visible Levels
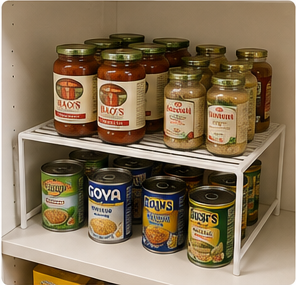
Shelf risers can solve another common problem: wasted vertical space.
If your pantry shelves are tall but the items stored on them are short, you’re paying for a lot of empty air.
A shelf riser creates another usable level.
They’re especially helpful for canned goods, jars, bowls, food-storage containers and other relatively short items.
But there’s an important distinction:
A shelf riser shouldn’t simply create another deep shelf where things can disappear.
Use risers where the additional level remains visible and reachable.
For example, a riser holding jars at the back of a shelf can elevate them above shorter items in front, allowing you to see both rows.
Measure the available height before buying a riser. Add the height of the organizer to the height of the products you plan to put on it and make sure everything will still fit beneath the shelf above.
Adjustable pantry shelf riser → View on Amazon
5. Use Tiered Organizers for Cans and Small Jars
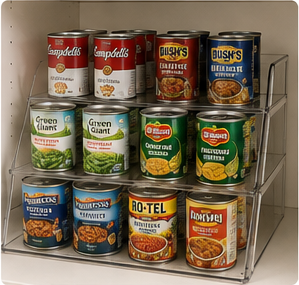
If your pantry contains lots of canned goods, lining them up six or seven cans deep isn’t ideal.
A tiered organizer can make each row progressively higher so you can see what’s behind the first row.
These are particularly useful for:
- Canned vegetables
- Soup
- Tomato products
- Small jars
- Spices
- Baking ingredients
The principle is simple: use vertical height to restore visibility lost to shelf depth.
However, check the total dimensions carefully.
A tiered organizer may fit the depth of your shelf but become too tall once cans are placed on the highest tier.
Measure the available vertical clearance before ordering one.
Tiered pantry can organizer → View on Amazon
6. Divide Deep Shelves Into Zones
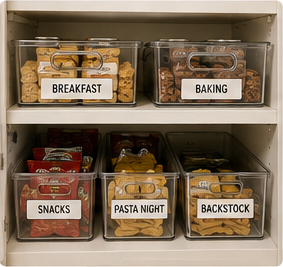
Deep shelves become chaotic quickly when unrelated foods are mixed together.
Instead, assign categories to specific areas.
For example:
Breakfast: cereal, oatmeal, pancake mix
Pasta night: pasta, sauce, canned tomatoes
Baking: flour, sugar, chocolate chips, baking supplies
Snacks: crackers, bars, chips, nuts
Backstock: unopened duplicates and bulk purchases
The categories don’t need to be Pinterest-perfect.
They just need to make sense to the people using the pantry.
When everything has a general home, you know approximately where to look instead of searching through the entire shelf.
If you’re working on the whole pantry rather than just the deep-shelf problem, our 21 Small Pantry Organization Ideas That Actually Save Space covers additional ways to improve pantry layout, visibility and capacity.
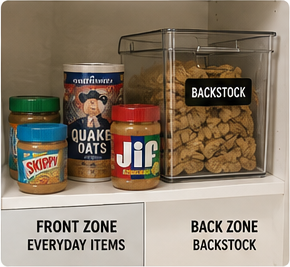
7. Treat the Back of the Shelf as a Different Storage Zone
Here’s another approach that works particularly well on extremely deep shelves:
Stop pretending the front and back have to function the same way.
Instead, deliberately divide the shelf into two zones.
Front zone: everyday items
Keep frequently used food where it’s easy to grab.
Back zone: backstock or occasional-use items
Use the harder-to-reach area for things you don’t need every day.
That might include:
- Extra pasta
- Backup condiments
- Bulk purchases
- Holiday baking ingredients
- Unopened packages
- Duplicate staples
This is much better than accidentally turning the back into storage for random food you forget exists.
The difference is intentionality.
If you’re using the back for backstock, keep similar items together and make sure you can still tell what’s there.
A labeled bin can work well because you can pull the entire category forward when you need something.
8. Choose Bins Based on What You’re Storing
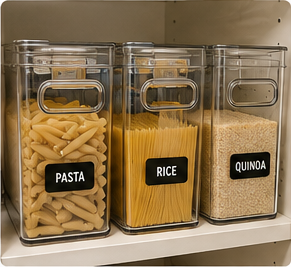
Matching clear bins can make a pantry look beautiful.
That doesn’t mean you should buy twelve of them before figuring out what they’re supposed to hold.
Choose the storage method based on the food.
A long narrow bin may be perfect for snack bars but terrible for large bags of chips.
A wide basket might handle bulky packages well but waste space if you’re storing small jars.
Before buying a bin, ask:
What exactly is going inside this?
Then consider:
- How wide is the product?
- How tall is it?
- Will the bin need to slide out?
- Can you see what’s inside?
- Will packages stand upright or fall over?
- How much clearance does the handle require?
- Can you comfortably lift the bin when it’s full?
That last question matters more than people realize.
A huge bin filled with canned goods may technically fit your shelf but become extremely heavy and annoying to use.
Organizers should make the pantry easier—not merely prettier.
Clear handled pantry storage bins → View on Amazon
9. Avoid Overfilling Pull-Out Bins
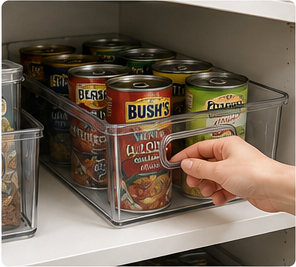
Pull-out storage only works when it actually pulls out.
If a bin is wedged tightly between neighboring organizers, overloaded with heavy food, or stuffed above its sides, accessing it becomes frustrating.
Leave enough room to grab the handle and slide the bin forward without disturbing everything around it.
This is also why buying organizers solely from their listed dimensions can be misleading.
A 10-inch-wide bin and a 10-inch-wide opening may sound like a match, but in real life you usually want some clearance.
You need room for your hand, slight shelf irregularities, product handles and normal movement.
Fit and function are not the same thing.
That’s a principle we’ll come back to repeatedly at Space Well Used because it’s one of the biggest differences between storage that merely fits and storage that actually works.
10. Store Heavy Items Lower
Deep pantry shelves sometimes tempt people to use every available inch—including high shelves for heavy bulk items.
Be careful.
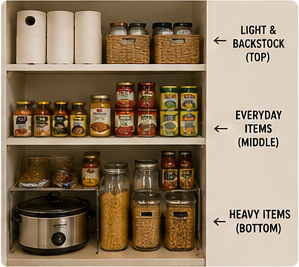
Heavy containers, large jars, canned goods and bulky appliances are generally easier and safer to retrieve from lower shelves.
Higher shelves are better suited to lighter items such as:
- Paper goods
- Lightweight backstock
- Empty containers
- Rarely used serving pieces
- Lightweight baskets
If you have to reach overhead, you don’t want to pull a heavy bin toward your face just to see what’s inside.
11. Use Clear Containers Where Visibility Matters Most
You don’t need to decant every food item into matching containers.
In fact, transferring everything into containers can create extra work without solving the real problem.
But clear storage can be very useful in a deep pantry because it reduces another layer of visual uncertainty.
You can see whether the snack bin is full.
You can see what’s sitting behind the pasta.
You can see whether you’re almost out of something.
Use clear containers strategically where visibility helps, rather than assuming every package needs to be removed from its original packaging.
12. Keep Frequently Used Items Between Waist and Eye Level
Your easiest-to-reach shelves are valuable real estate.
Use them for foods you access regularly.
The exact height will depend on your pantry and household, but the basic idea is:
Most-used items → easiest shelves
Occasionally used items → less convenient shelves
Lightweight backstock → higher shelves
Heavy or bulky items → lower shelves
This matters even more in a deep pantry because reaching upward and backward at the same time is awkward.
A beautifully organized pantry isn’t particularly functional if you need a step stool every morning to reach the cereal.
13. Don’t Buy Organizers Until You Know the Problem
This may be the most important tip in the entire article.
Don’t begin with:
“What organizers should I buy?”
Begin with:
“Why isn’t this shelf working?”
Maybe cans disappear behind one another.
A tiered organizer could help.
Maybe bottles are impossible to reach.
A turntable might be better.
Maybe bags of snacks collapse into a pile.
A pull-out bin could solve that.
Maybe you have plenty of depth but not enough vertical capacity.
A shelf riser might be the answer.
Maybe nothing is actually wrong with the shelf—you simply have too much food stored there.
No organizer can create unlimited capacity.
This problem → constraint → solution approach prevents you from filling the pantry with storage products that don’t address the reason it was frustrating in the first place.
A Simple Deep-Pantry Decision Guide
If you’re not sure which organizer makes sense, start here.
Items disappear behind each other:
Try a tiered organizer or shelf riser.
Bottles and jars are hard to reach:
Try a turntable.
Loose packages become messy:
Try a pull-out bin.
You have lots of vertical space above short items:
Try a shelf riser.
The shelf is extremely deep:
Consider separating everyday items in front from organized backstock behind.
You can’t tell what you already own:
Prioritize clear storage and visibility.
Organizers technically fit but are awkward to use:
Recheck clearance, opening width and whether the organizer needs space to slide, rotate or lift.
What Not to Do With Deep Pantry Shelves
Some organization methods look efficient but actually make deep shelves harder to use.
Avoid:
- Filling the entire shelf with rows of loose products
- Hiding small items behind large boxes
- Buying bins before measuring
- Using containers so deep you can’t reach their contents
- Packing organizers together with no clearance
- Storing heavy pull-out bins above your head
- Decanting everything purely for appearance
- Buying matching organizers without deciding what each one will store
- Treating inaccessible back space as everyday storage
And don’t assume unused space automatically equals wasted space.
Sometimes leaving a few inches of breathing room makes an organizer substantially easier to pull out or rotate.
Usable space is more important than completely filled space.
For more ideas throughout the rest of your home, see our 25 Storage Ideas for Small Homes That Make Every Inch Count. Many of the same principles—using vertical space, choosing storage based on access and making overlooked areas functional—apply well beyond the pantry.
How to Organize Deep Pantry Shelves on a Budget
You don’t need to replace every container at once.
Start with the shelf causing the biggest problem.
Empty it.
Measure it.
Identify exactly why it’s difficult to use.
Then buy one type of organizer that solves that specific problem.
For example, if sauces constantly disappear at the back, test one appropriately sized turntable.
If snacks become a pile, try one pull-out bin.
If canned goods are impossible to see, test a tiered organizer.
Live with the solution for a little while before buying six more.
That approach costs less and gives you a chance to discover what actually works in your pantry.
You may find that different shelves require completely different solutions—and that’s okay.
A pantry is a working storage space, not a showroom.
The Best Deep Pantry Setup Is Usually a Mix
There isn’t one perfect organizer for every deep pantry shelf.
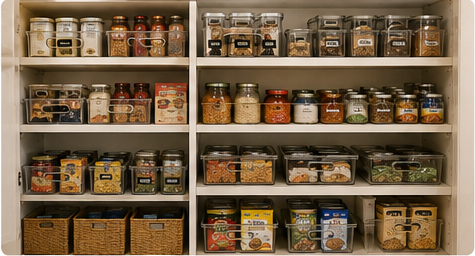
In fact, the most functional pantry will often use several different approaches.
You might have:
- A turntable for sauces
- A tiered organizer for cans
- Long pull-out bins for snacks
- A shelf riser for jars
- A backstock bin on a lower shelf
- An open shelf for bulky appliances
That’s more practical than forcing every shelf into identical containers simply because they look coordinated.
If you’re also struggling with limited kitchen storage outside the pantry, our 17 Small Kitchen Organization Ideas for Maximizing Limited Space includes additional ways to make cabinets, drawers, counters and overlooked kitchen areas work harder.
Frequently Asked Questions
What is the best way to organize a very deep pantry?
Focus on making items visible and retrievable rather than simply filling the entire depth. Turntables work well for bottles and jars, pull-out bins bring items from the back forward, and tiered organizers or shelf risers help prevent shorter items from disappearing behind taller ones. Extremely deep shelves can also be divided intentionally into everyday storage in front and organized backstock behind.
Are deep pantry shelves better with bins?
Sometimes. Bins are particularly useful when they allow an entire category of food to slide forward. However, a deep bin that is difficult to remove can create another inaccessible storage area. Choose bins based on what you’re storing and how you’ll access them.
How do you keep food from getting lost in the back of a pantry?
Avoid creating multiple invisible rows of loose products. Use organizers that rotate, slide or elevate items, and reserve difficult-to-reach areas for intentional backstock rather than everyday food.
Should pantry bins be as deep as the shelf?
Not necessarily. A deeper bin can use more of the shelf, but only if it remains easy to pull out and access. A slightly shallower organizer that you use comfortably is often better than one that fills the entire shelf but becomes cumbersome.
What should go on the highest pantry shelves?
Higher shelves generally work best for lightweight, infrequently used items and backstock. Avoid putting very heavy bins or containers overhead, particularly if they must be pulled forward to see what’s inside.
Make the Depth Work for You
Deep pantry shelves aren’t bad storage.
They’re simply storage that needs a different strategy.
Instead of stacking groceries from front to back and hoping you remember what’s behind them, organize around visibility, reach and movement.
Measure the space first.
Identify what’s making each shelf difficult to use.
Then choose the solution that addresses that specific problem.
When you stop trying to cram as much as possible onto every shelf and start making the entire depth accessible, a deep pantry can become one of the most useful storage areas in your home.